Samsung data recovery is an excellent data recovery software, the vast majority of Samsung Galaxy users widely used. With help, users can recover lost and deleted data from almost all Samsung Galaxy devices and SD cards, including call logs, photos, videos, audio, contacts, WhatsApp messages, and so on. In addition, the software also allows you to recover lost data from broken / damaged Samsung or Samsung crack / dead / blank screen. In addition, with the help of Samsung data recovery, you can backup and restore your Samsung data, unlock your Samsung, fix Samsung's Samsung, and eradicate your Samsung without losing data. Next, we'll show you how to recover deleted and lost files, such as Samsung Galaxy S8 contacts, through this easy-to-use recovery tool.
If you need this kind of help, you can download the trial version of Android data recovery for free.


Steps to Recover Deleted Data Contacts from Samsung Galaxy S8
Part 1. Android Data Recovery for Windows Users
Step 1. Connect Your Android Phone
Launch dr.fone toolkit for Android on your computer, and select Data Recovery among all the toolkits.

Connect your Android phone to the computer using a USB cable. Please make sure you have enabled USB debugging on your Android phone.

If your Android os version is 4.2.2 or above, there will be a pop up message on your Android phone, tap on OK to allow USB debugging.

Step 2. Select file types to scan
After the phone is connected successfully, dr.fone for Android will display all the data types it supports to recover. By default, it has checked all the file types. You can just select the type of data that you'd like to recover. And then click "Next" to continue the data recovery process.

Step 3. Scan your device to find the lost data on it
There are two scanning modes. You can read the description and choose the "Standard Mode" or the "Advanced Mode" here to continue according to your need. We recommend you to try "Standard Mode" first, which works faster. If it doesn't find the files you are looking for, you can then try "Advanced Mode".
Now, click "Start" to begin analyzing and scanning your device.

Now, dr.fone toolkit for Android is scanning your Android phone to recover deleted data. This process will take a few minutes. Just be patient. Precious things are always worth waiting for.

Note: There might be a Superuser authorization appearing on your device during the scan. If you get it, click "Allow" to continue. If not, just skip this step.
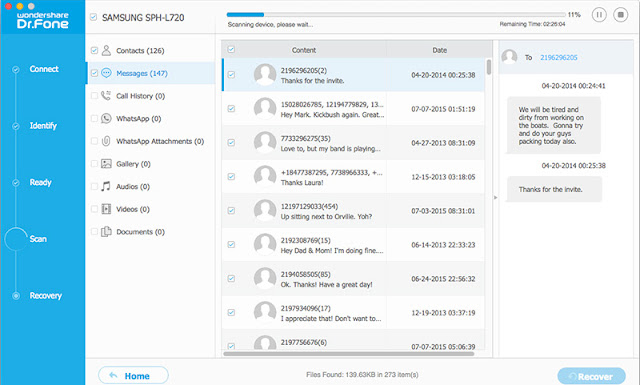
Step 4. Preview and recover deleted data on Android devices
When the scan is complete, you can preview the found data one by one. Check the items you want and click "Recover" to save them all on your computer.

Part 2. Android SD Card Data Recovery
Have deleted data on your SD card accidentally? Keep your shirts on. Instead of letting it go, you can now learn how to recover deleted data on your SD card. Now, let's see how to recover deleted data from SD card.
Step 1. Connect a micro SD card via your Android device or a card reader
Firstly, launch dr.fone toolkit for Android on your computer, select Data Recovery toolkit. Click on Android SD Card Data Recovery at the bottom of the program.

Then connect your SD card to the computer. There are two ways for you to get your SD card connected: using a card reader or using your Android device with it. Choose the way better for you.
When your SD card is detected by the program, you will see the window as follows. Select your SD card and click "Next" to continue.

Step 2. Select a scan mode to scan your SD card
There are two scan modes for Android SD card recovery. Our suggestion is to try the Standard Mode first. If you can't find what you want, you can try the Advance Mode later. Using Standard Mode, you can choose to scan for only deleted files or scan for all files on your SD card. The latter is suggested, which will help you find more complete files.

Select the recovery mode you would like to try and click on Next to begin scanning your SD card.

Step 3. Preview and recover data from your SD card selectively
After the scanning process, all found files will be displayed in categories. From the left sidebar, you can click different data types to display the corresponding results. You can selectively check or un-check the files and then click "Recover" to start the data recovery process.

Part 3. Android Data Recovery for Mac Users
Step 1. Install and run the program on your Mac
After the downloading, install and launch the software on your Mac. Then you'll see the primary window as the screenshot shown on the side.

Step 2. Connect your Android device to your Mac
Use a USB cable to connect your Android phone or tablet to your Mac. When your device is successfully detected by the computer, this program will also detect it automatically.

Step 3. Select the file type to scan
Now the program is ready to scan your device. You can selectively choose the type of files that you want to retrieve. Then move on.

Step 4. Scan device and recover data from your Android now
When everything is OK. The program starts scanning your device for data on it, including the lost file and the existing data. You can selectively choose whatever you want later for recovery.After the scan is compelted, you can preview all recoverable data one by one. Then choose the item you want and click "Recover" to save them on your computer.