Friday, April 23, 2021

アンドロイドから失われた写真とビデオを回復する方法

要約:誤って写真やビデオをAndroid上で削除?あなたは簡単にAndroidの携帯電話から削除された写真やビデオを回復するプロのAndroidの写真のビデオ回復ソフトウェアを使用することができます。

あなたの人造人間電話のルート操作の後、あなたの人造人間電話の写真とビデオは失われます?誤ってサムスンAndroidの携帯電話上の写真やビデオを削除?アンドロイドシステムアップデートの写真や動画を失った?Androidの回復は、Androidから失われた写真やビデオを回復するのに役立ちますか?このチュートリアルでは、Androidの写真やビデオの回復のためのさまざまなソリューションについて学びます。

失われた写真やビデオをAndroidから回復

Androidのデータ回復は、すべての失われたか削除された写真、ビデオとAndroidでオーディオファイルを回復するようになっている信頼できるプロの回復ソフトウェアです。それは完全にあなたのサムスン銀河系s /注、HTC、モトローラ、ソニー、LGとより人気のAndroid装置と互換性を持ちます。写真やビデオに加えて、それはまた、連絡先、メッセージ、呼び出し履歴、オーディオファイル、WhatsAppとドキュメントなどのデータを復元することができます。


アンドロイドデータ回復によってアンドロイドから写真とビデオを回復してください

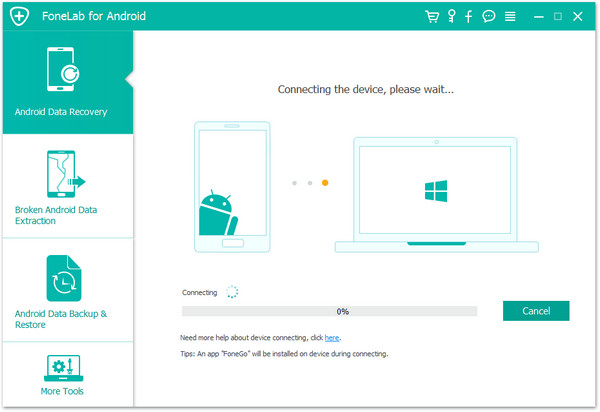
ステップ1 . Androidをコンピュータに接続する

最初にAndroidのデータリカバリをダウンロードして、コンピュータ上で起動し、それを実行し、USBを使用してPCにAndroidを接続してください。


ステップ2 . AndroidでUSBデバッグを開きます

ここでは、AndroidのステップでUSBデバッグを開く正しい方法があります。

Android 4.2以降の場合は、「設定」を入力してください。「設定電話」をクリックして「ビルド番号」を「ビルドモード数」を「開発者モードの下」になるまで数回タップします。

2 ) Android 3.0から4.1の場合:「設定」を入力して「開発者オプション」をクリックしてチェックします。

3 ) Android 2.3以前では、「設定」を入力して「アプリケーション」をクリックします。

4)Android 5.0または新しい:タップ“設定”の“電話について”を“ビルド番号”をタップするにはsignal.Then「設定」→「開発者オプション」に移動して「USBデバッグ」を有効にする


ヒント:Androidの7.0 / 6.0以上のAndroidのために、ちょうどあなたの電話でOKをクリックしてUSBのデバッグを許可するので、プログラムは電話を検出することができます。


あなたがAndroidから回復したいファイルタイプを選択してください

デバッグプロセスを簡単に検出できるようになりますAndroid.Once お使いのデバイスが検出され、プログラムはすべてのデータのためのデバイスをスキャンすると、カテゴリからファイルタイプを選択する必要があります“ギャラリー”、“連絡先”、“メッセージ”、次に“次へ”ボタンをクリックします。


これは、次のように、“許可”をタップし、プログラムをスキャンし、お使いの携帯電話上の選択されたファイルを分析する許可をタップします。


ステップ4。アンドロイド

スキャンを開始し、データをあなたの人造人間電話に格納分析。


ステップ5 .プレビューとAndroidから失われたデータを取得する

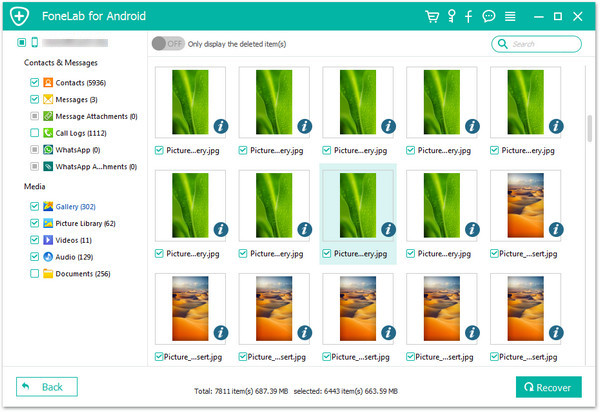
スキャンが完了すると、すべてのデータは、メディアファイルを含むリストに表示されます:ギャラリー、画像ライブラリ、ビデオ、オーディオ、ドキュメント、アプリケーションデータ;とテキストファイル:連絡先、メッセージ、メッセージの添付ファイル、通話ログ、WhatsApp&WhatsAppAttachments.Please 復元したいファイルを選択してくださいdetails.In 最後のステップは、ちょうどあなたが回復したいとクリックして“回復”をコンピュータ上で保存するデータを選択します。
Androidから削除された写真を回復

スキャン結果では、Huawei写真やギャラリーを回復するには、クリックしてください“ギャラリー”と“画像ライブラリ”アイテムの分類の左側のすべての回収可能な写真を1つでプレビューし、その後、すぐに必要な行方不明の写真を選択することができます削除されたファイルを一覧表示するにはオプションを削除します。最後に、クリックして“回復”ボタンをHuawei写真を回復し、コンピュータ上でそれらを保存することができます。


Android上で選択的に連絡先を回復

Androidのデータ復旧は、GS 8デバイスをスキャンします。スキャンが行われると、連絡先の名前、電話番号、電子メールなどを含む詳細に連絡先をプレビューする連絡先をチェックし、連絡先またはすべての連絡先をクリックして失われたマークをクリックして“回復”はあなたのHuaweiデバイスから戻って不足している連絡先を回復し、すべての検索された連絡先は、VCF、CSVまたはHTML使用してコンピュータに保存されます。


Androidからテキストメッセージを回復

スキャンが完了すると、すべての削除されたテキストメッセージを回復する前にプレビューできます。チェック“メッセージ”アイテムを1つずつプレビューする。あなたは、名前、日付、内容、および時間を含むウィンドウ内のすべての会話を読むことができます。その後、Huaweiで失われたSMSを選択することができますし、“回復”ボタンをクリックしてそれらを回復することができますわずか数秒、あなたのSMSのすべて削除され、CSV形式、HTML形式と添付画像としてコンピュータに保存されます削除されます。


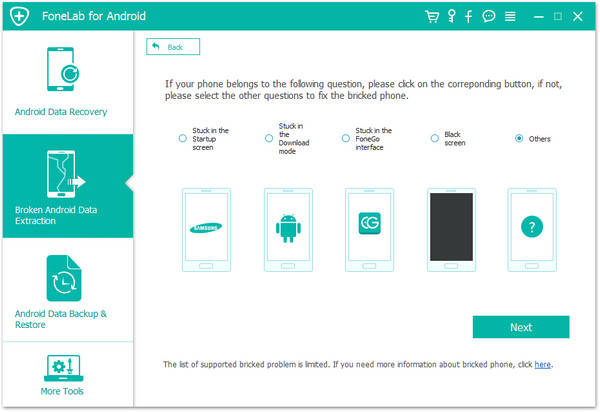
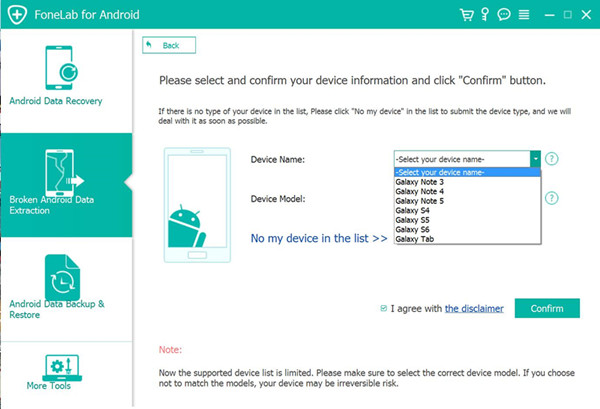
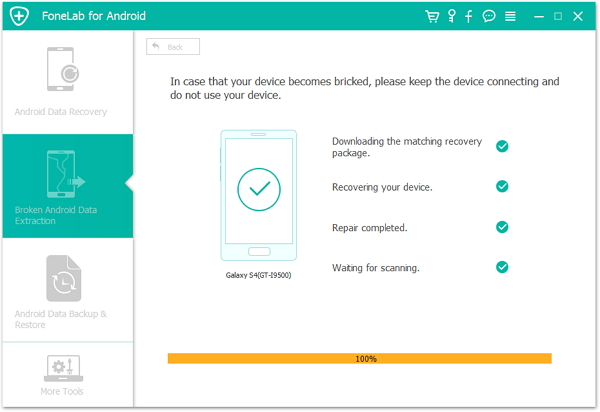
あなたが誤って工場のリセットまたは他の理由のためにAndroidからデータを失ったかどうかにかかわらず、あなたはどんなデータ損失なしででも彼らを戻すために安全で効果的な方法を持っている必要があります、Androidデータ回復はデータのために使われるあなたの最高のアクセシビリティですrecovery.In 追加それを抽出し、壊れた画面から壊れたデータを回復することができます壊れた画面、黒い画面または他の損傷situation.In あなたの人造人間電話またはタブレットで失われるか、削除されるデータを避けるために、我々はあなたにバックアップデータを推薦して、Androidデータバックアップツールで工場リセットの後、Huaweiに回復します。バックアップと復元の連絡先、SMS、写真、コンピュータ上のAndroidからの詳細をサポートしていますが、また、直接データ損失なしでiPhoneとAndroidの間のデータを転送することができます。


壊れたサムスン銀河系S 6から連絡先を回復する方法

「重いものでスーパーマーケットで電話をしていたとき、サムスンギャラクシーS 6は地面に滑り落ちて壊れた。画面が壊れています。誰かが壊れたサムスンギャラクシーS 6から連絡先を回復することができますか?またはそれを修正するいくつかの実用的な方法を与えるか?ありがとう、トム。

あなたはトムと同じ問題を抱えているし、壊れたサムスン銀河系S 6からの連絡先を抽出したい場合は、サムスンのロゴ画面で、サムスンのスタックモードでは、サムスンは、ダウンロードモードでは、サムスン画面が壊れたり、他の問題が立ち往生。一部の人々は慎重に連絡先をバックアップしますが、ほとんどはありません。異常なサムスンからデータを得る方法を知らないでください?ここでは、適切な場所にあり、このページでは、あなたの壊れた電話で保存したい連絡先を回復するための可能性があります。

壊れたサムスン銀河系S 6から接触を抽出すること

USBデバッグなしで壊れた人造人間電話から連絡先を回復してください、あなたはこの壊れたAndroidデータ抽出をためさなければなりません。その名前のように、それはあなたの個人的なデータを保存し、連絡先、メッセージ、写真、ビデオ、メモ、コールログ、メモ、WhatsAppメッセージ、アプリなどを含む破損サムスン電話から直接データを抽出することができますときに水の損傷、システムクラッシュ、ロック画面、黒い画面、クラッシュ、ウイルスの攻撃などのサムスンの壊れた状況に遭遇する。あなたが選択的にアクセスし、壊れたサムスンデータを壊れたAndroidのデータ抽出を介して回復することができます。それはサムスン銀河系S 6 / S 5 / S 4 /注5 /注4 /注3に適しています。


Androidのデータ回復でAndroidからデータを回復

ステップ1:まず最初に、無料ダウンロードして、上記のリンクを使用してコンピュータ上のプログラムをインストールします。その後、プログラムが自動的に終了時に起動します。インターフェイスの左側に壊れたAndroidの携帯電話のデータ抽出を選択します。

ステップ2:USBケーブルでコンピュータにあなたの生体内電話を接続してください。あなたのAndroidデバイスが壊れた画面、黒い画面または非応答画面に滞在した場合、スタートをクリックしてください。あなたの人造人間デバイスのシステムが破損している場合は、クリックして修正デバイスをクリックし、それを操作することはできません。ここで修正デバイスを選択します。


ステップ3:お使いの携帯電話が直面している状況を選択してください:スタートアップ画面で立ち往生、ダウンロードモードでは、Fonegoのインターフェイス、黒画面などで立ち往生。をクリックして移動します。


ステップ4:デバイス名とデバイスモデルを含むあなたの人造人間デバイスの正しい情報を選択してください。「確認」をクリックして移動します。


ステップ5:プログラムは回復パッケージをダウンロードし、冷凍Androidシステムを修復します。それが完了したら、アクセスして、削除されたファイルを含むあなたの人造人間データをスキャンするAndroidのデータ復旧機能に移動することができます。


ステップ6:詳細を表示するには、左ペインにメッセージとメッセージの添付ファイルをチェックし、回復する項目をマークして、コンピュータに保存するために回復をクリックします。


このソフトウェアの助けを借りて、あなたは携帯電話からのAndroidの写真を取得することができますデッドフォンからのデータを回復するなど。なぜ今あなたのPC上でそれを得るか?

Thursday, April 22, 2021

How to Erase All Photos/Videos on iPhone Permanently

Summary: Before selling your old iPhone, you must permanently delete all photos and videos on iPhone permanently, so as to avoid privacy being retrieved by third-party data recovery software, and you can't get your personal information once? In this article, you can definitely find the best way to erase iPhone photos and videos.

In the face of many powerful data recovery software, simple deletion is obviously not enough. Simple deleting and restoring factory settings can't really delete your iPhone photos and videos, a special data recovery program can easily restore deleted photos and videos from your iPhone again. Does that mean we have to surrender? Of course not! Thanks to the iPhone Data Eraser, our privacy has always been the biggest guarantee.

Permanently delete iPhone data before sale

IPhone data eraser, a multifunctional data erasure software, provides IOS users with the most reliable and secure erasure solution, permanently erasing all data, including pictures, videos, call logs, SMS, web browsing history, settings and more, and deleting junk files from iPhone, iPad and iPod touch. More importantly, it uses the U.S. military's method of destroying data to ensure that any data deleted from your iPhone cannot be recovered, and to protect the security of your personal information to the greatest extent. In addition, the program is fully compatible with IOS 14 / 13 / 12 and supports iPhone 12 / 11 / XS / XR.


How to Permanently Delete Data on iPhone
In order to remove your data from your iPhone permanently, you can follow the instructions given as below:
Launch dr.fone on your computer and select Erase among all the modules.
Next, let's check how to use dr.fone - Erase (iOS) to completely erase iOS private data in steps.

Step 1. Connect your device to the computer

Plug your iPhone or iPad to the computer with a lightening cable. Tap on Trust on your iPhone/iPad screen to make sure the iPhone/iPad connects successfully.
When dr.fone recognizes your iPhone/iPad, it will display two options, Erase Full Data and Erase Private Data. Here we select Erase Private Data to continue.

Step 2. Scan the private data on your iPhone

To erase your private data on the iPhone, you need to scan the private data first. Click the "Start Scan" button to let the program scan your iPhone.
It will cost you some time. Just wait until you can see all the found private data in the scan result.

Step 3.Start erasing private data on your iPhone permanently

You can preview all the private data found in the scan result, such as photos, messages, contacts, call history and more. Select the data you want to erase, and click on the Erase from the Device button to start erasing them.
Since the erased data can't be recovered again, we can't be too careful to proceed the erasing. Enter "delete" in the box to confirm the erasing and click "Erase now".
When the private data erasure begins, you can take a cup of coffee and wait for its end. It takes you some time. Your iPhone/iPad will be restarted a few times during the process. Please don't disconnect your device to ensure a successful data erasure.
Once the process is complete, you will see an "Erase Completed" message on the window of the program.


Wednesday, April 21, 2021

How to Bypass Passcode Lock Screens on iPhones and iPads

[summary]: Are you looking for a way to remove broken iPhone locked passcode? You will learn how to unlock the screen passcode from a broken iPhone without a passcode.

For data security, IOS users will set lock screen password or fingerprint lock to protect privacy and information. Sometimes, we not only make a mistake in the passcode of the iPhone and iPad, but also lock it completely. For example, after entering the wrong passcode six times in a row, the iPhone and iPad are disabled. At that time, you may consider restoring the phone to its original factory settings, but it will erase all the existing data on your iPhone. Obviously, this is not a good solution. How to unlock iPhone and iPad to lock screen without losing data?

Unlock iPhone iPad Locked Screen without data loss

IOS unlock can remove passcode from iPhone for you in 5 minutes. Before that, you need to know that "find my iPhone / iPad" should be disabled. Then you can successfully bypass the passcode lock screen of iPhone and iPad, and then you can use your iPhone again. It can also unlock 4-digit passcode, 6-digit passcode, touch ID and face ID. It works on all iPhones, including the latest iPhone 11.


1.Launch dr.fone - Unlock on your system. From the welcome screen, select the option of “Unlock” to start the process.


2.Now, using a USB/lightning cable, connect your iPhone to the system and wait for a while as the application will recognize it automatically. Afterward, click on the “Start” button.


3. After detecting your device, it will display a interface where the iPhone DFU mode needs to be activated. Proceed by following the instructions.


4. Provide correct information related to your phone’s model, firmware version, and more in the new window. Make sure that you have provided the right information before clicking the “Download” button.


5. The application will automatically download the related firmware update for your device. It might take a while to complete the download. Afterward, click on the “Unlock Now” button.


6. Type in the confirmation code from the on-screen instruction to initiate the process.


7.Once it is completed successfully, you will be notified with the following message. If you are not happy with the results, then you can click on the “Try Again” button to repeat the process.


Your device will be like brand new and you would be able to perform iPhone or iPad disabled fix without iTunes as well.
    

How to Bypass the Lock Screen on iPhone/iPad

Summary: This article teaches you how to unlock the lock screen of iPhone and iPad. This method will not let you lose data, and it is safe and efficient.

As we all know, Apple's security is very good. It protects the customer's data and data is very tight. It's good for a lot of people, but it's troublesome for some. As time goes by, many people forget their iPhone / iPad unlock password. Although Apple doesn't offer a simple way to unlock IOS devices without losing data, there are still some ways to solve this problem. However, when you do this, your data and saved settings will be lost. To learn how to unlock the iPhone / iPad without a password, follow this technique.

Remove the Screen Lock on iPhone and iPad

IOS unlock can not only help you easily unlock iPhone 4 / 6-digit passcode, face ID, touch ID, but also unlock Apple ID and icloud account on any iPhone / iPad / iPod without password. This software is efficient, convenient and safe. What's more surprising is that it works on all iPhones, including the latest iPhone 12.


1.Launch dr.fone - Unlock on your system. From the welcome screen, select the option of “Unlock” to start the process.


2.Now, using a USB/lightning cable, connect your iPhone to the system and wait for a while as the application will recognize it automatically. Afterward, click on the “Start” button.


3. After detecting your device, it will display a interface where the iPhone DFU mode needs to be activated. Proceed by following the instructions.


4. Provide correct information related to your phone’s model, firmware version, and more in the new window. Make sure that you have provided the right information before clicking the “Download” button.


5. The application will automatically download the related firmware update for your device. It might take a while to complete the download. Afterward, click on the “Unlock Now” button.


6. Type in the confirmation code from the on-screen instruction to initiate the process.


7.Once it is completed successfully, you will be notified with the following message. If you are not happy with the results, then you can click on the “Try Again” button to repeat the process.


Your device will be like brand new and you would be able to perform iPhone or iPad disabled fix without iTunes as well.
    

How to Recover Lost Data from iPhone XS

Summary: my worry is, if my iPhone XS loses data, how can I retrieve my lost data? We need to use a powerful and simple tool to do this. Thi...