Wednesday, January 17, 2018

How to Transfer Text Messages between Samsung and iPhone

In this article, I will show you the easiest way to transfer text messages between Samsung phone and iPhone. If you would like to know this, you come to the right place. After reading this article, you can easily transfer text messages from Samsung to iPhone or from iPhone to Samsung phone. I will use Phone Transfer software in this article. It can connect your iPhone and Samsung phone at the same time and transfer messages and other files between them freely.
Phone Transfer is designed for mobile phone users to transfer files between two phones. It supports iPhone and Samsung phone perfectly. You can transfer text messages, photos, contacts, videos, music, calendars and other data between iPhone and Samsung phone easily. You can learn how to transfer contacts from Samsung to iPhone and how to transfer photos from iPhone to Samsung.


  
Now follow me to transfer text messages between Samsung and iPhone with this Phone Transfer.

Step 1. Connect Samsung and iPhone to Computer

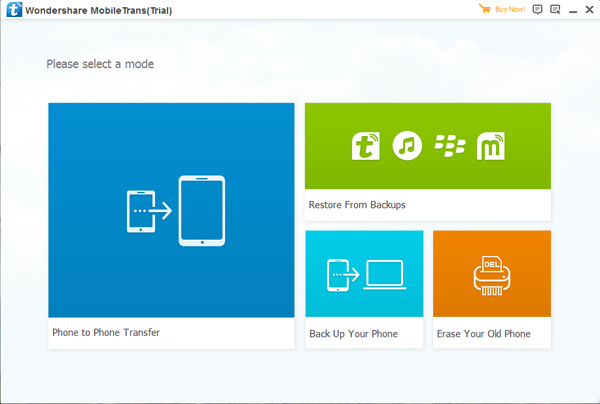
Free download, install and run this Phone Transfer software on your computer. On the main interface, select “Phone to Phone Transfer” mode. You will see the following interface.

Connect your Samsung phone and iPhone to computer via USB cable. The software will detect and recognize your phones easily and load them to its interface.


Step 2. Transfer Text Messages between Samsung and iPhone

The software will transfer text messages from the left side to the right. So if you want to transfer text messages from Samsung to iPhone, you need to make sure your Samsung phone on the left side of the interface. If transfer text messages from iPhone to Samsung, put your iPhone on the left side. If you want to change the order of the two phones, click “Flip” button. The software will change the order automatically.
In the middle of the interface, you will see a data menu. Here lists all the data you can transfer between Samsung and iPhone. Select “Messages” on the menu and other data you want to transfer. Click “Start Copy” button, the software will transfer text messages from Samsung to iPhone or from iPhone to Samsung.

After transferring, you can find the text messages easily on iPhone or Samsung. You can also select the option to delete text messages on the destination device before transferring. That means if you select this option, before transferring text messages from Samsung to iPhone, all the text messages on iPhone will be wiped and then transfer all the messages from Samsung to it.
That’s all for transferring text messages between Samsung and iPhone. This Phone Transfer can do this easily with few clicks. You can also transfer photos, videos, contacts, call logs, calendars, Apps and app data between Samsung phone and iPhone easily with this Phone to Phone Transfer software.


  

How to Recover Deleted Text Messages from Samsung S9/S9+

As a big fan of Samsung, I often keep track of the news about Samsung. Recently some news about Samsung is in development. It's said that in the era of full screen, it's new product Samsung Galaxy S9/S9+ is going to utilize a full screen. Also, it will utilize a 5.8-inch display, the body thickness is 8mm, and the S9+ amplifies to 6.2 inches. What's more, it will be equipped a snapdragon 845 processor, a double 16 megapixels and a front double 12 megapixel camera. At the same time, it supports IP68 waterproof and dustproof. According to thses configurations, we can see how advanced it is. Let's watch for the day it's released.  

Apparently, with this high intelligent mobile phone, we can do a lot of things, including send messages, store plentiful photos, download more apps and so on. It seems that we are increasingly relying on our phones, thus, more and more data are stored in our phone inch by inch. Have you ever experienced the error of deleting some data, expecially some significant messages? I know it's restless because I have experienced it. Neverthless, you needn't be annoyed at losing some data by accident from now on, because there is a good solution. Now let me introduce it to you.
  
In fact, the solution I mentioned above is to download a professional data-recovery software--Android Data Recovery, which is the best tool to recover deleted files from Android phone/SD card/tablet on Windows 10/8/7 and macOS Sierra/macOS High Sierra. Apart from this, it has plentiful features. Firstly, it can recover deleted files on Android in many situations. Whether you losing data after factory restore, OS update or rooting, forgotten password or more, it can recover the delected data instantly. Secondly, it enables you to recover various data, including call logs, messages, photos an so on. Thirdly, it can recover data not only from the internal memory, but also from the SD card and SIM card. Last but not least, this software only reads the information on your device, your data will be protected perfectly. Your personal information will not be stored in the software, so you needn’t be afraid of leaking your provacy during the process.
Known so many practical features about the Android Data Recovery, are you curious about how to operate it? It's also easy to operate and dosen't require any professional knowledge. Now let me take an example of recovering delected text messages from Samsung Galaxy S9/S9+ to help you master the method.


Steps to recover delected text messages from Samsung Galsxy S9/S9+

Step 1. Launch Android Data Recovery and connect your mobile phone.
  
To beginning with, please download and run this powerful Android data recovering software on your computer. Then connect your Samsung Galaxy S9/S9+ to the computer via USB cable. After managing to concatenate your phone, the Android Data Recovery will automatically detect it.


Step 2. Enable USB debugging.
  
In order to initiate the data-recovery process, you need to open the debugging mode on your phone. If you don't open it, Android Data Recovery will prompt you to do. It will detect your Android version and teach you how to open the USB debugging mode on your phone. Just follow the instructions. After finishing the operations on your phone, click "OK" button to go to the next step.
  
  
Step 3. Select the data types you want to recover.
  
After connection, all file types on your Android will be showed in the interface. It;s flexible so you can choose the file types you want to recover. For instance, you can select the "Messages"  to recover your delected meaasges. Then click "Next" button to scan the selected Android data.


Step 4. Recover Android data.
  
When the scanning is finished, all types of files will be listed in categories on the left control. You are able to check the detailed information of each data. Preview and select the text messages you have an inclination to recover, and then click "Recover" button to complete recovering process.
  

Warm tips: please ensure that your Samsung Galaxy S9/S9+ and computer are connected all through the process, or else it'll be not smoothly and take you longer time to wait.

How to Recover Photos/Pictures from Samsung Galaxy Note 8

"I'm so sorry that I deleted all photos from Samsung Note 8. That's not what I expected. Originally, I just wanted to delete the bad photos. Now, all the photos on the phone have been deleted, and I feel that the precious memories have disappeared. I wanted to get back to them, but I didn't know how to do it." - Asked by Berstett.
We can understand people's occasional failures, especially in the use of mobile phones. Now almost all of the mobile phone is no button, we can operate the mobile phone by gently stroke or click. Because of this, many mistakes have also appeared. When we accidentally delete photos and pictures from our phones, we can find some ways to solve them. But first of all, we need understand the fact that the deleted data in the phone can be recovered in general. If you don't know about this, then you might give up restoring deleted data.


Now, I'll figure out how to recover the photos or pictures in the Samsung Note 8.
Samsung Data Recovery software, which is a powerful program helping you to recover photos or pictures from Samsung Galaxy Note 8. What's more, it also allows you recover deleted or lost contacts, SMS, videos, WhatsApp messages, call logs and other documents from Samsung Galaxy Note 8 and other Android devices. It does not disappoint your expectations, almost all Android devices can use it, in addition to Samsung, as well as HUAWEI, ZTE, LG, OPPO, SONY, vivo and so on. With this tool, the general data recovery scenario can be resolved. It has become one of the most popular data recovery software because of its powerful and perfect work efficiency.

Download Win Download Mac

Steps to Restore Deleted and Lost Photos from Samsung Galaxy Note 8

Step 1. Download and install this software

Download and install Samsung Data Recovery on your computer. Launch it and select "Data Recovery" among all the toolkits.


Step 2. Connect your Samsung Galaxy Note 8 to the computer

Please connect your Samsung Galaxy Note 8 to the computer with the USB cable. And it is noticeable that you have enabled USB debugging on your phone.


Step 3. Choose the data type to scan

Next, you need to tick the data type to scan. Here are Gallery, text messages, videos, contacts, etc., you can just tick Gallery because you want to restore photos and pictures. Then click "Next" to going to scan.


Step 4. Scan your Samsung Galaxy Note 8 to find the lost data

There are two scanning modes. You can choose the "Standard Mode" or the "Advanced Mode" here to continue. We recommend you to try "Standard Mode" first, which works faster. After you select a mode, click "Start" to start analyzing and scanning your Samsung Note 8.


Note: There might be a Superuser authorization appearing on your device during the scan. If you get it, click "Allow" to continue. If not, just skip this step.


Step 5. Preview and recover the deleted photos and pictures selectively

When the scan process is stopped, you can see that all the scanned data is displayed on a list, and they are also recoverable. Please click on the "Gallery" in the left column, and then you can preview photos and pictures. Tick them according to your needs and click "Recover".

Download Win Download Mac

Saturday, November 4, 2017

The 3 steps is to complete the data transfer between Android and Android

How do you transfer data from Android to Android? USB cable can only transfer video, photos, music and other media files, if you want to transfer contacts, messages, call history and other data, you have to help through the third party software. This article will introduce you to a simple, convenient and safe way to transfer data.

Transfer mobile phone data from Android to Android

To transfer data from mobile phones (including contacts, text messages, whatapp messages, call history) from Android to Android, it is strongly recommended to use Phone to Phone Transfer. It's a simple, easy-to-use tool to transfer Android data to Android.

In addition to transferring photos, videos, music and other media files, it can also transfer data such as contacts, SMS, call history, calendar, applications, files, etc.. In addition to the transfer between Android and Android, it can also transfer data between Android, iOS, symbian.


In addition to data transmission, it can also backup and restore data and wipe data before selling mobile phones. Phone to Phone Transfer adapt for all mobile phone models, including HUAWEI (Mate 10 (Pro) 9 / Mate, P10 / P9), Samsung (Galaxy S7 / S6 / S5), HTC, Lenovo, Motorola, Google, ZTE, Pixel, millet, LG and so on.

If you want to know more about Phone to phone transfer, please read the details below.


Three Steps to Transfer Datas from Android to Android:

Here,I will take transfer contacts from Galaxy Note 3 to Galaxy S8 for example,you also can switch other file types from any Android phone to Samsung S8/S8 Plus directly.

Step 1.Connect two Samsung Galaxy with the computer
Connect both of your Samsung Note 3 and Samsung S8 with computer via USB cables, then Phone Transfer will detect them immediately. You will be able to see the below screenshot in the front of your window.


Step 2.Select Contacts you Want to Transfer
Check whether your source and target phones are placed under the "Source" and "Destination" categories respectively. If they aren’t, you can click the "Flip" button from the center to place the phones in their correct categories.And then select the file types you want to move from old Samsung Galaxy Note 3 to new Galaxy S8,please select “Contacts” item if you just want to transfer contacts,you can also select music, photos, videos, SMS and other file types,then move them at onces.


Step 3.Transfer Contacts from Samsung Galaxy to Galaxy S8/S8+
Finally click the "Start Transfer" button to begin the transfer. When the transferring comes to an end, you should click "Completed".Only few mintues,all of your contacts be moved to your new Samsung Galaxy S8,then you can use the previous contacts on your new phone.


Note: Please keep connecting your two phones with computer during the transferring process.In addittional,you can click the "Clear data before copy" checkbox from the bottom of the Destination section, and click the "Confirm" button from the "Clear phone data" confirmation box in order to allow the Phone Transfer program to erase the data from the target phone (Samsung S8) before transferring the new data to it.

Download the Phone to Phone Transfer and try to move data from Android to the new Samsung Galaxy S8 with one click:


Tips:You can also use this Samsung Manager tool to manage your phone’s data on computer,and transfer music, photos, videos, contacts, SMS between two mobiles (both Android and iPhone are supported).

Wednesday, November 1, 2017

How to recover iPhone x/8/7 lost data after ios 11/10 jailbreak.

Many iOS users have updated their iOS devices to iOS 11, where many users jailbreak their own iOS devices after updating to iOS 11, and want to experience more functionality. However, there is a problem that can not be ignored, in their own iOS device jailbreak, it may lead to iOS device data loss.

How to retrieve missing data after the iOS 11 jailbreak from the iOS device

At present, there are many iPhone 8, iPhone 7 and other iOS users choose to jailbreak their devices iOS. Although the jailbreak can make your equipment experience more interesting features, however, you may lose your important data, such as: Contacts, Messages, Call, history, Photos, Notes, Video, Calendar, Reminder, WhatsApp, messages, Messenger, Voice, memos, Voicemail, Safari's bookmark, App's photos, App's video, App's documents and so on. this is a very big problem. How to recover lost data from a iOS 11 after jailbreak?
If you have a backup in iTunes or iCloud, you can be restored data from the backup in iPhone. However, after the restoration of it will erase all content and settings in your iPhone x/8/7. Now there's a better, safer, easier way to recover, and with the help of the iPhone data recovery program that you can easily get any kind of data without backup.
This iPhone data recovery tool is a powerful recovery software, that can help you easily extract lost Contacts, Messages, Call, history, Photos, Notes, Video, Calendar, Reminder, WhatsApp messages, Messenger, Voice, memos, Voicemail, Safari's bookmark, App's photos, App's video, App's documents and so on from iPhone X/8/7 after iOS 11/10 jailbreak.

Now you can download it for free on your computer, and then follow the instructions below to recover lost data from a iOS 11 jailbreak iPhone X/8/7.


Three Part to Get Disappeared and Missing Data Back from iOS Devices:

Part 1. Recover Contact from iPhone Device Directly

Step 1. Connect iOS Device with Computer

Launch dr.fone toolkit on your computer. Use the USB cable that comes with your iOS device to connect your iPhone, iPad or iPod touch, to your computer. Click on "Data Recovery" and select "Recover from iOS Device" option.

Tips: Before running dr.fone, you're supposed to download the latest version of iTunes. To avoid the automatically sync, don't launch iTunes when running dr.fone toolkit. I suggest you disable the automatical syncing in iTunes beforehand: launch iTunes > Preferences > Devices, check “Prevent iPods, iPhones, and iPads from syncing automatically”.

Step 2. Scan Your Device for Lost Data on It

Simply click the "Start Scan" button to let this program scan your iPhone, iPad or iPod touch to scan for deleted or lost data. The scanning g process may last a few minutes, depending on the amount of data on your device. During the scanning process, if you see that the data you're looking for is there, then you can click the "Pause" button to stop the process.

Step 3. Preview the Scanned Data

The scan will take you some time. Once it's completed, you can see a scan result generated by the program. Data both lost and existing on your device are displayed in categories. To filter out the deleted data on your iOS device, you can swipe the option "Only display the deleted items" to ON. By clicking the file type in the left side, you can preview the found data. And you can see there is a search box on the top right of the window. You can search for a specific file by typing a keyword in the search box.

Step 4. Recover Data from Your iPhone/iPad/iPod touch

When you find the data you need, just put the check mark in front of the box to select them. After then, click the "Recover" button at the bottom right of the window. By default, the recovered data will be saved to your computer. As for text messages, iMessage, contacts, or notes, when you click Recover, a pop-up will ask you to "Recover to Computer" or "Recover to Device". If you want to put these messages back to your iOS device, click "Recover to Device".
iOS recover deleted devices

Part 2. Recover Contac from iTunes Backup

Step 1. Choose Recovery Mode

Launch dr.fone and select "Recover from iTunes Backup File" from "Data Recovery" tool. After then, the iTunes backup recovery tool will detect all iTunes backup files on this computer and display them in the window. You can confirm which one is the one you need according to the date it has been created.

Step 2. Scan Data from iTunes Backup File

Choose the iTunes backup file that contains the data you want to recover and click "Start Scan". It will take a few minutes to extract all data from the iTunes backup file. Be patient.

Step 3. Preview and Recover Data from iTunes Backup

After a few seconds, all data in the backup file will be extracted and displayed in categories. You can preview them one by one before recovery. Then you can selectively mark and recover those you want by pressing the "Recover" button at the bottom. Now contacts, notes and messages can be directly recovered to your iOS device if you keep your iOS device connected with your computer via a USB cable during the recovery process.
Tips: you can see there is a search box in the result window. From there, you can type in the name of a file to search for it.

Part 3. Recover Contact from iCloud Backup

Step 1. Choose Recovery Mode

After running dr.fone toolkit, choose the recovery mode of "Recover from iCloud Backup Files" from "Data Recovery" on the dashboard. Then you'll see the window below. Enter your iCloud account and password to login. dr.fone takes your privacy seriously. We never keep a record of any your Apple account info or content at any time during your sessions.

Step 2. Download iCloud Backup File

When you logged into iCloud, the program can find all iCloud backup files in your account. Choose the one where you're going to recover data and click on the "Download" button.

And then in the pop-up, you can choose the type of files you would like to download. This will reduce the time of downloading the iCloud backup file. After that, you can scan the iCloud content now. Click on the "Scan" button to begin. It will take you some time. Just wait for a moment.

Step 3. Preview and Recover Data from iCloud Backup File

The scan will be complete in a few minutes. Once it stops, you can preview almost all data in your iCloud backup file, like contacts, messages, photos, and more. Check them one by one and tick the item you want. Then click on the "Recover to Computer" or "Recover to your device" button to save them on your computer or your device with one click.
Now contacts, messages and notes can be directly recovered to your iOS device if your iPhone, iPad or iPod touch is connected with your computer with a USB cable during the recovery process.


In life, accidents happen at any moment, so we have to store our important data on the computer periodically in order to avoid losing data.

What’s more about iOS Data Recovery:


iPhone/iPad/iPod Recovery is a powerful and useful ios data recovery to recover WhatsApp, photos, videos, music files, SMS, Contacts, Messages, Call History etc deleted or lost from your iPhone & other Apple devices such as iPad, iPod Touch. No matter your ios devices is lost, stolen, broken, or you deleted some files of it by accident,this data recovery for iPhone can help you restore any lost data only few clicks.

Related Articles

How to Recover Lost Data from iPhone XS

Summary: my worry is, if my iPhone XS loses data, how can I retrieve my lost data? We need to use a powerful and simple tool to do this. Thi...